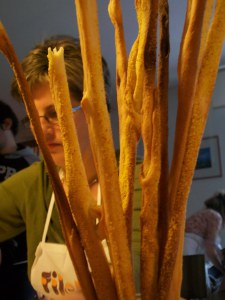
Grissini stirati torinesi: il pane che si allunga
I grissini torinesi sono una lezione di panificazione concentrata in pochi ingredienti: farina, acqua, lievito, sale e olio d’oliva. Ma il grissino stirato non nasce semplicemente da un impasto sottile. Nasce da un gesto preciso: allungare con le mani una striscia di pasta già fermentata, senza schiacciarla.
La sua storia appartiene al Piemonte e alla cultura della corte sabauda. Una tradizione collega il nome all’antica ghërsa, o grissia, forma di pane allungata che alcune ricostruzioni fanno risalire al Medioevo, talvolta al Trecento. Non è però una datazione certa della nascita del grissino attuale. La leggenda più celebre lo colloca nel 1679: il panettiere Antonio Brunero, su suggerimento del medico Teobaldo Pecchio, avrebbe realizzato per il giovane Vittorio Amedeo II un pane più sottile e asciutto.
Il grissino entrò nell’immaginario della corte. Le storie sulla principessa Maria Felicita di Savoia e sulla passione di Napoleone per i grissini torinesi appartengono alla tradizione gastronomica e vanno lette come racconti, non come prove della ricetta originale. Dalle tavole aristocratiche il prodotto si diffuse nella vita quotidiana piemontese e poi nell’Italia settentrionale.
Oggi esistono grissini arrotolati, stirati, rustici, ai semi, al formaggio e prodotti industriali perfettamente uniformi. Io continuo a preferire gli stirati: secchi, friabili, leggermente irregolari. La loro forma racconta il lavoro della mano. Non è necessario aggiungere molto: bisogna soprattutto scegliere la farina giusta, non stressare l’impasto e cuocerli finché perdono l’umidità residua.
La ricetta — grissini stirati all’olio d’oliva
Resa: circa 30–40 grissini di 30–40 cm, in funzione di taglio e spessore.
Tempo attivo: circa 30–40 minuti.
Fermentazione: circa 75–110 minuti a 23–25 °C, valutando la crescita reale.
Cottura: circa 15–20 minuti per teglia.
Allergeni: glutine; altri allergeni solo in caso di aggiunte.
Ingredienti per una dose
- 500 g farina di grano tenero tipo 0, forza W 200–240, indicativamente 10,5–12% di proteine. In Germania si può usare Weizenmehl Type 550 con adeguate caratteristiche panificabili; il numero 550 non garantisce da solo il valore W.
- 270 g acqua potabile, indicativamente a 20–24 °C, da regolare in relazione alla temperatura della farina per ottenere un impasto finale a 24–26 °C.
- 60 g olio extravergine d’oliva, dal fruttato leggero, senza amaro o piccante predominanti.
- 10 g sale fino, pari al 2% della farina.
- 7 g lievito di birra fresco compresso (Frischhefe), oppure 2–2,5 g di lievito di birra secco istantaneo (Trockenhefe): sceglierne uno, non entrambi; non usare lievito chimico (Backpulver).
- 20–30 g semola rimacinata di grano duro per spolverare (fuori impasto).
- 10 g circa di olio extravergine per spennellare la superficie (fuori impasto).
Percentuali del fornaio: farina 100%, acqua 54%, olio 12%, sale 2%, lievito fresco 1,4%. Per una versione a fermentazione più lunga occorre ricalibrare il lievito e i tempi; non basta aspettare più ore lasciando invariata la formula.
Procedimento, senza passaggi sottintesi
- Impasto. Sciogliere il lievito fresco nell’acqua; con il secco istantaneo seguire le indicazioni del produttore. Unire l’acqua alla farina e impastare finché non resta farina asciutta. Aggiungere il sale, poi l’olio gradualmente, aspettando che venga assorbito. Impastare circa 8–10 minuti a bassa velocità oppure 12–15 minuti a mano. La massa deve essere liscia, elastica ma estensibile, non appiccicosa. Temperatura finale obiettivo: 24–26 °C.
- Rilassamento. Se l’impasto si ritira, coprirlo e lasciarlo riposare 10–15 minuti. Non aggiungere farina inutilmente per irrigidirlo.
- Rettangolo. Spolverare leggermente un piano o una teglia con semola. Modellare l’impasto in un rettangolo indicativo di 30 × 10 cm, conservando un certo spessore: non deve diventare una sfoglia sottile. Spennellare con poco olio e coprire per evitare che la superficie secchi.
- Lievitazione. Lasciare a 23–25 °C fino a un aumento visibile di circa 50–70%, indicativamente 75–110 minuti complessivi, incluso il breve rilassamento. La massa deve essere soffice e gonfia, ma non collassata. Non attendere automaticamente un raddoppio se la pasta è già molto fragile.
- Preparare il forno. Preriscaldare a 200 °C statico, oppure 180–185 °C ventilato, e preparare le teglie con carta da forno. Cuocere una teglia per volta se il forno domestico scalda in modo irregolare.
- Tagliare. Con una raschia o una spatola affilata tagliare trasversalmente dal lato corto strisce larghe circa 8–12 mm. Non rimpastare e non arrotolare: si perderebbe il carattere dello stirato.
- Stirare. Prendere ogni striscia dalle estremità, sollevarla e allungarla dolcemente, lasciando che anche il peso della pasta aiuti la trazione. Accompagnare il centro senza schiacciare tutta l’aria. Lunghezza obiettivo: 30–40 cm o quanto consente la teglia; spessore finale indicativo 5–8 mm. Disporre i grissini con almeno 2 cm di distanza.
- Cuocere. Infornare sul ripiano centrale per circa 15–20 minuti a 200 °C statico. Controllare prima i grissini più sottili: devono essere uniformemente dorati e asciutti anche nel punto più spesso, non bruni e amari. Con ventilato controllare già dopo 13–15 minuti. La durata reale dipende dal forno e dalla dimensione.
- Raffreddare. Trasferire subito su griglia, ben distanziati, per circa 20–30 minuti. Se da freddi sono ancora morbidi al centro, asciugarli ancora 5–8 minuti a 140 °C, controllando frequentemente, quindi raffreddare di nuovo. Non chiuderli caldi in contenitori.
Risultato atteso e correzione degli errori
Il grissino corretto si spezza con un rumore netto, ha cuore asciutto e una croccantezza friabile, non una durezza vetrosa. Se le strisce si ritirano, la maglia glutinica è troppo tesa: concedere più riposo e controllare la forza della farina. Se si rompono durante lo stiramento, controllare lievitazione e manipolazione. Se sono gommosi dopo il raffreddamento, serve maggiore asciugatura in forno o uno spessore inferiore.
Conservazione e varianti
Conservare soltanto quando completamente freddi in contenitore ben chiuso, al fresco e all’asciutto: indicativamente 5–7 giorni di buona croccantezza in condizioni domestiche asciutte. Il lino è utile durante il raffreddamento, ma non protegge dall’umidità per diversi giorni. Con sesamo, papavero, rosmarino o farine integrali cambiano assorbimento, superficie e tempi: ogni variante va provata senza dare per scontata l’equivalenza della formula.
Grissini stirati: Turin breadsticks, stretched rather than rolled
Flour, water, yeast, salt and olive oil: there is little mystery in the ingredient list. The real identity of grissini stirati lies in how a fermented strip of dough is stretched by hand, keeping some of the gas inside, until it becomes a long, fine breadstick.
The story belongs to Piedmont and the Savoy court. The name is traditionally linked to an older elongated loaf known as ghërsa or grissia; some accounts take that bread tradition back to medieval times, even the fourteenth century. Such dates should not be mistaken for firm documentation of today’s grissino. The better-known court legend places its creation around 1679, when baker Antonio Brunero, encouraged by physician Teobaldo Pecchio, is said to have made a thinner, drier bread for the young Vittorio Amedeo II.
Stories about Princess Maria Felicita of Savoy and Napoleon’s fondness for Turin breadsticks remain part of the product’s culinary folklore. From aristocratic tables, grissini became an everyday food throughout Piedmont and much of northern Italy. I prefer the irregular hand-stretched version to an industrial, perfectly cylindrical stick: you can still see the baker’s gesture in it.
Recipe — hand-stretched Turin breadsticks
Yield: approximately 30–40 sticks, 30–40 cm long.
Active work: roughly 30–40 minutes.
Fermentation: approximately 75–110 minutes at 23–25°C, guided by dough development.
Baking: 15–20 minutes per tray.
Allergen: wheat/gluten.
Ingredients
- 500 g Italian type 0 soft wheat flour, medium strength W 200–240 and approximately 10.5–12% protein. A comparable medium-strength bread flour is suitable; a flour grade alone does not guarantee its W value.
- 270 g drinking water, approximately 20–24°C, adjusted for a finished dough temperature of 24–26°C.
- 60 g mild extra virgin olive oil, without dominant bitterness or pepperiness.
- 10 g fine salt, 2% of flour weight.
- 7 g fresh compressed baker’s yeast, or 2–2.5 g instant dry baker’s yeast. Choose one. Baking powder is not a substitute.
- 20–30 g finely milled durum semolina for dusting, not part of the dough.
- About 10 g extra olive oil for brushing, not part of the dough.
Baker’s percentages: flour 100%, water 54%, oil 12%, salt 2%, fresh yeast 1.4%. To use a slower fermentation, adjust the yeast quantity and timing rather than simply extending the proof.
Method
- Mix. Dissolve fresh yeast in the water; for instant yeast follow the manufacturer’s instructions. Add the liquid to the flour. Once combined, add salt, then oil gradually until absorbed. Knead 8–10 minutes on low mixer speed or 12–15 minutes by hand. Aim for smooth, elastic but extensible dough at 24–26°C, not a sticky or overly tight mass.
- Rest. If the dough springs back strongly, cover and rest for 10–15 minutes. Do not compensate by adding excessive flour.
- Shape the slab. Dust a tray or worktop lightly with durum semolina. Shape a rectangle roughly 30 × 10 cm, retaining enough thickness for later stretching. Brush very lightly with oil and cover well so no skin forms.
- Proof. At 23–25°C, allow the dough to increase visibly by about 50–70%, usually 75–110 minutes overall including the brief relaxation. It should feel aerated but not overproofed or collapsing. Doubling is not an obligatory target.
- Prepare the oven. Preheat to 200°C conventional/static or 180–185°C fan. Line the trays with baking parchment.
- Cut. Using a bench scraper, cut strips across the short edge of the rectangle, about 8–12 mm wide. Do not roll the strips into ropes or knead them again.
- Stretch. Hold a strip at both ends and let its weight assist a gentle extension. Support the middle as needed, without flattening out every gas bubble. Aim for about 30–40 cm length and 5–8 mm thickness, or whatever fits the tray. Leave at least 2 cm between sticks.
- Bake. Bake centrally at 200°C conventional for approximately 15–20 minutes, checking thinner pieces earlier. For a fan oven, begin checking around 13–15 minutes. Grissini should be evenly golden and dry right through their thickest point, not dark brown.
- Cool and dry. Move to a wire rack immediately and cool for 20–30 minutes. If still soft at the centre once cool, return for 5–8 minutes at 140°C, watching closely, then cool again. Never seal warm breadsticks in a container.
What good grissini feel like
They should snap cleanly and be crisp and friable rather than glass-hard. If the strips keep contracting, allow more relaxation and reconsider flour strength. If they tear, look at proofing and handling. If they become chewy after cooling, they need a thinner shape or more thorough drying.
Storage and variations
Store fully cooled breadsticks in an airtight tin or container, in a dry place. They can retain good crispness for approximately 5–7 days under favourable household conditions. Linen is helpful while cooling, but does not prevent moisture uptake over several days. Sesame, poppy seed, rosemary or wholemeal flour can work, but they change water absorption and surface behaviour and should be tested rather than treated as identical substitutions.
Grissini stirati aus Turin: von Hand gezogen, nicht gerollt
Weizenmehl, Wasser, Hefe, Salz und Olivenöl. Die Zutatenliste ist einfach. Was die traditionellen Turiner grissini stirati auszeichnet, ist die Verarbeitung: Streifen aus bereits gegärtem Teig werden vorsichtig in die Länge gezogen, ohne die eingeschlossene Luft vollständig herauszudrücken.
Die Geschichte führt nach Piemont und an den Hof der Savoyer. Der Name wird mit der älteren länglichen Brotform ghërsa, auch grissia genannt, verbunden. Einige Überlieferungen reichen bis ins Mittelalter oder sogar ins 14. Jahrhundert zurück; als gesicherte Entstehungszeit des heutigen Grissino taugen diese Angaben jedoch nicht. Die bekannteste Hoflegende nennt das Jahr 1679: Der Bäcker Antonio Brunero soll auf Anregung des Arztes Teobaldo Pecchio für den jungen Vittorio Amedeo II. ein schmaleres, trockeneres Brot entwickelt haben.
Auch die Geschichten um Prinzessin Maria Felicita von Savoyen oder Napoleons Vorliebe für Turiner Grissini gehören zur kulinarischen Überlieferung. Aus der höfischen Küche gelangten die Brotstangen auf die Alltagstische in Piemont und Norditalien. Mich interessiert vor allem die von Hand gezogene Variante: dünn, knusprig und nicht vollkommen gleichmäßig. Man sieht ihr die Arbeit noch an.
Rezept — Turiner Grissini von Hand gezogen
Ergibt: ungefähr 30–40 Stück, je nach Länge und Dicke.
Aktive Arbeitszeit: ca. 30–40 Minuten.
Teiggare: ca. 75–110 Minuten bei 23–25 °C, je nach Teigentwicklung.
Backzeit: ca. 15–20 Minuten je Blech.
Allergen: Weizen/Gluten.
Zutaten
- 500 g Weizenmehl italienischer Type 0, mittlere Stärke W 200–240 und etwa 10,5–12 % Protein. In Deutschland eignet sich ein gut backfähiges Weizenmehl Type 550; die Typenzahl allein sagt aber nichts Verlässliches über den W-Wert aus.
- 270 g Trinkwasser, ungefähr 20–24 °C; die Wassertemperatur so anpassen, dass der fertige Teig 24–26 °C erreicht.
- 60 g mildes natives Olivenöl extra, nicht übermäßig bitter oder scharf.
- 10 g feines Salz, 2 % der Mehlmenge.
- 7 g Frischhefe (Bäckerhefe) oder 2–2,5 g Instant-Trockenhefe. Nur eine Sorte verwenden. Backpulver ist kein Ersatz.
- 20–30 g fein gemahlener Hartweizengrieß (Semola rimacinata) zum Bestäuben, zusätzlich.
- Etwa 10 g Olivenöl zum dünnen Bestreichen, zusätzlich.
Bäckerprozente: Mehl 100 %, Wasser 54 %, Olivenöl 12 %, Salz 2 %, Frischhefe 1,4 %. Für eine längere Teigführung müssen Hefemenge und Zeit neu abgestimmt werden.
Zubereitung
- Kneten. Frischhefe im Wasser auflösen; Instant-Trockenhefe nach Herstellerangabe einsetzen. Wasser mit Mehl vermischen, dann Salz und anschließend das Öl portionsweise einarbeiten. Etwa 8–10 Minuten langsam in der Maschine oder 12–15 Minuten von Hand kneten. Der Teig soll glatt, elastisch und gut dehnbar sein, nicht klebrig und nicht übermäßig straff. Zieltemperatur: 24–26 °C.
- Entspannen. Wenn der Teig beim Formen stark zurückspringt, abdecken und 10–15 Minuten ruhen lassen. Nicht unnötig Mehl zugeben.
- Rechteck formen. Arbeitsfläche oder Blech leicht mit Hartweizengrieß bestäuben. Den Teig ungefähr 30 × 10 cm groß formen, nicht hauchdünn ausrollen. Dünn mit Öl bestreichen und gut abdecken, damit keine trockene Haut entsteht.
- Gehen lassen. Bei 23–25 °C auf eine sichtbare Volumenzunahme von etwa 50–70 % warten; insgesamt meist 75–110 Minuten einschließlich kurzer Entspannungsphase. Der Teig soll luftig, aber nicht übergar und instabil sein. Ein exaktes Verdoppeln ist nicht nötig.
- Ofen vorbereiten. Auf 200 °C Ober-/Unterhitze oder 180–185 °C Umluft vorheizen. Bleche mit Backpapier auslegen.
- Schneiden. Mit einer Teigkarte Streifen quer von der kurzen Rechteckseite abtrennen, etwa 8–12 mm breit. Nicht erneut verkneten und nicht zu gleichmäßigen Rollen formen.
- Ziehen. Jeden Streifen an beiden Enden halten und mit wenig Zug und Hilfe des Eigengewichts verlängern. Die Mitte bei Bedarf unterstützen, ohne die gesamte Luft herauszupressen. Ziel sind ungefähr 30–40 cm Länge und 5–8 mm Dicke, angepasst an das Backblech. Mindestens 2 cm Abstand lassen.
- Backen. Bei 200 °C Ober-/Unterhitze auf mittlerer Schiene ungefähr 15–20 Minuten backen; dünne Stücke früher kontrollieren. Bei Umluft ab etwa 13–15 Minuten prüfen. Gleichmäßig goldbraun und auch in der Mitte durchgetrocknet ist richtig, dunkelbraun nicht.
- Abkühlen und nachtrocknen. Sofort auf ein Gitter legen und 20–30 Minuten auskühlen lassen. Sind sie danach innen noch weich, weitere 5–8 Minuten bei 140 °C nachtrocknen, aufmerksam beobachten und erneut vollständig auskühlen lassen. Nie warm luftdicht verpacken.
So erkennt man ein gutes Ergebnis
Ein Grissino bricht mit einem klaren Knacken und ist mürbe-knusprig statt hart wie Glas. Zieht sich der Teig beim Ausziehen ständig zurück, braucht er mehr Entspannung oder ein weniger starkes Mehl. Reißt er, Gare und Handhabung prüfen. Wird das Gebäck nach dem Abkühlen zäh, war es zu dick oder nicht ausreichend durchgetrocknet.
Aufbewahrung und Varianten
Vollständig ausgekühlt in einer dicht schließenden Dose trocken lagern. Unter günstigen Bedingungen bleiben die Grissini etwa 5–7 Tage angenehm knusprig. Ein Leinentuch eignet sich zum Auskühlen, schützt aber auf Dauer nicht ausreichend vor Luftfeuchtigkeit. Sesam, Mohn, Rosmarin oder Vollkornmehl verändern Wasseraufnahme und Backverhalten; solche Varianten sollten gesondert ausprobiert werden.